Many Certificate Authorities had recently tightened the requirements for using EV Code Signing Certificates. The industry standard is now that you need to either host your certificate’s private key on a physical USB token, or you can load it to the compliant Hardware Security Module (HSM). However, using a USB dongle would cause a lot of struggle with the modern Continuous Integration pipelines, as well as buying or renting the entire HSM and having to keep it physically connected at the office for the entire time.
Fortunately, there is a “middle ground” solution - you can rent just a single key slot at Google Cloud’s HSM. This solution is going to be fairly cost-efficient (approx. USD $2.50/month as of March 2023), compliant with the recent FIPS 140-2 Level 2 requirements and without requiring you to deal with the physical devices. In this article, we will describe how to set it up.
Note: This article is provided for free. We did our best to provide accurate information, but there is absolutely no warranty on the knowledge that you will learn from this article. We are not affiliated with, nor endorsed by any CA company. Please make sure to study and verify all the current requirements and best practices on your own.
Introduction: The overall idea
First of all, it might be useful to understand how the code signing process works in general when we are using the private key hosted in the cloud HSM. Please quickly study the diagram presented below.
In this diagram, we do have the following actors:
- Signing tool on your PC (or pipeline) - this is the application which performs the actual code signing on your executable. It could be ran locally or in the Continous Integration pipeline;
- Google Cloud - just the Google Cloud service;
- Google’s HSM with your private key - the physical Hardware Security Module hosted in Google’s datacenter that holds your private key without the possibility to steal/export it to an untrusted environment;
- Timestamp authority’s server with their private key - the server responsible for issuing a signed timestamp of the provided data hash, usually ran by your CA;
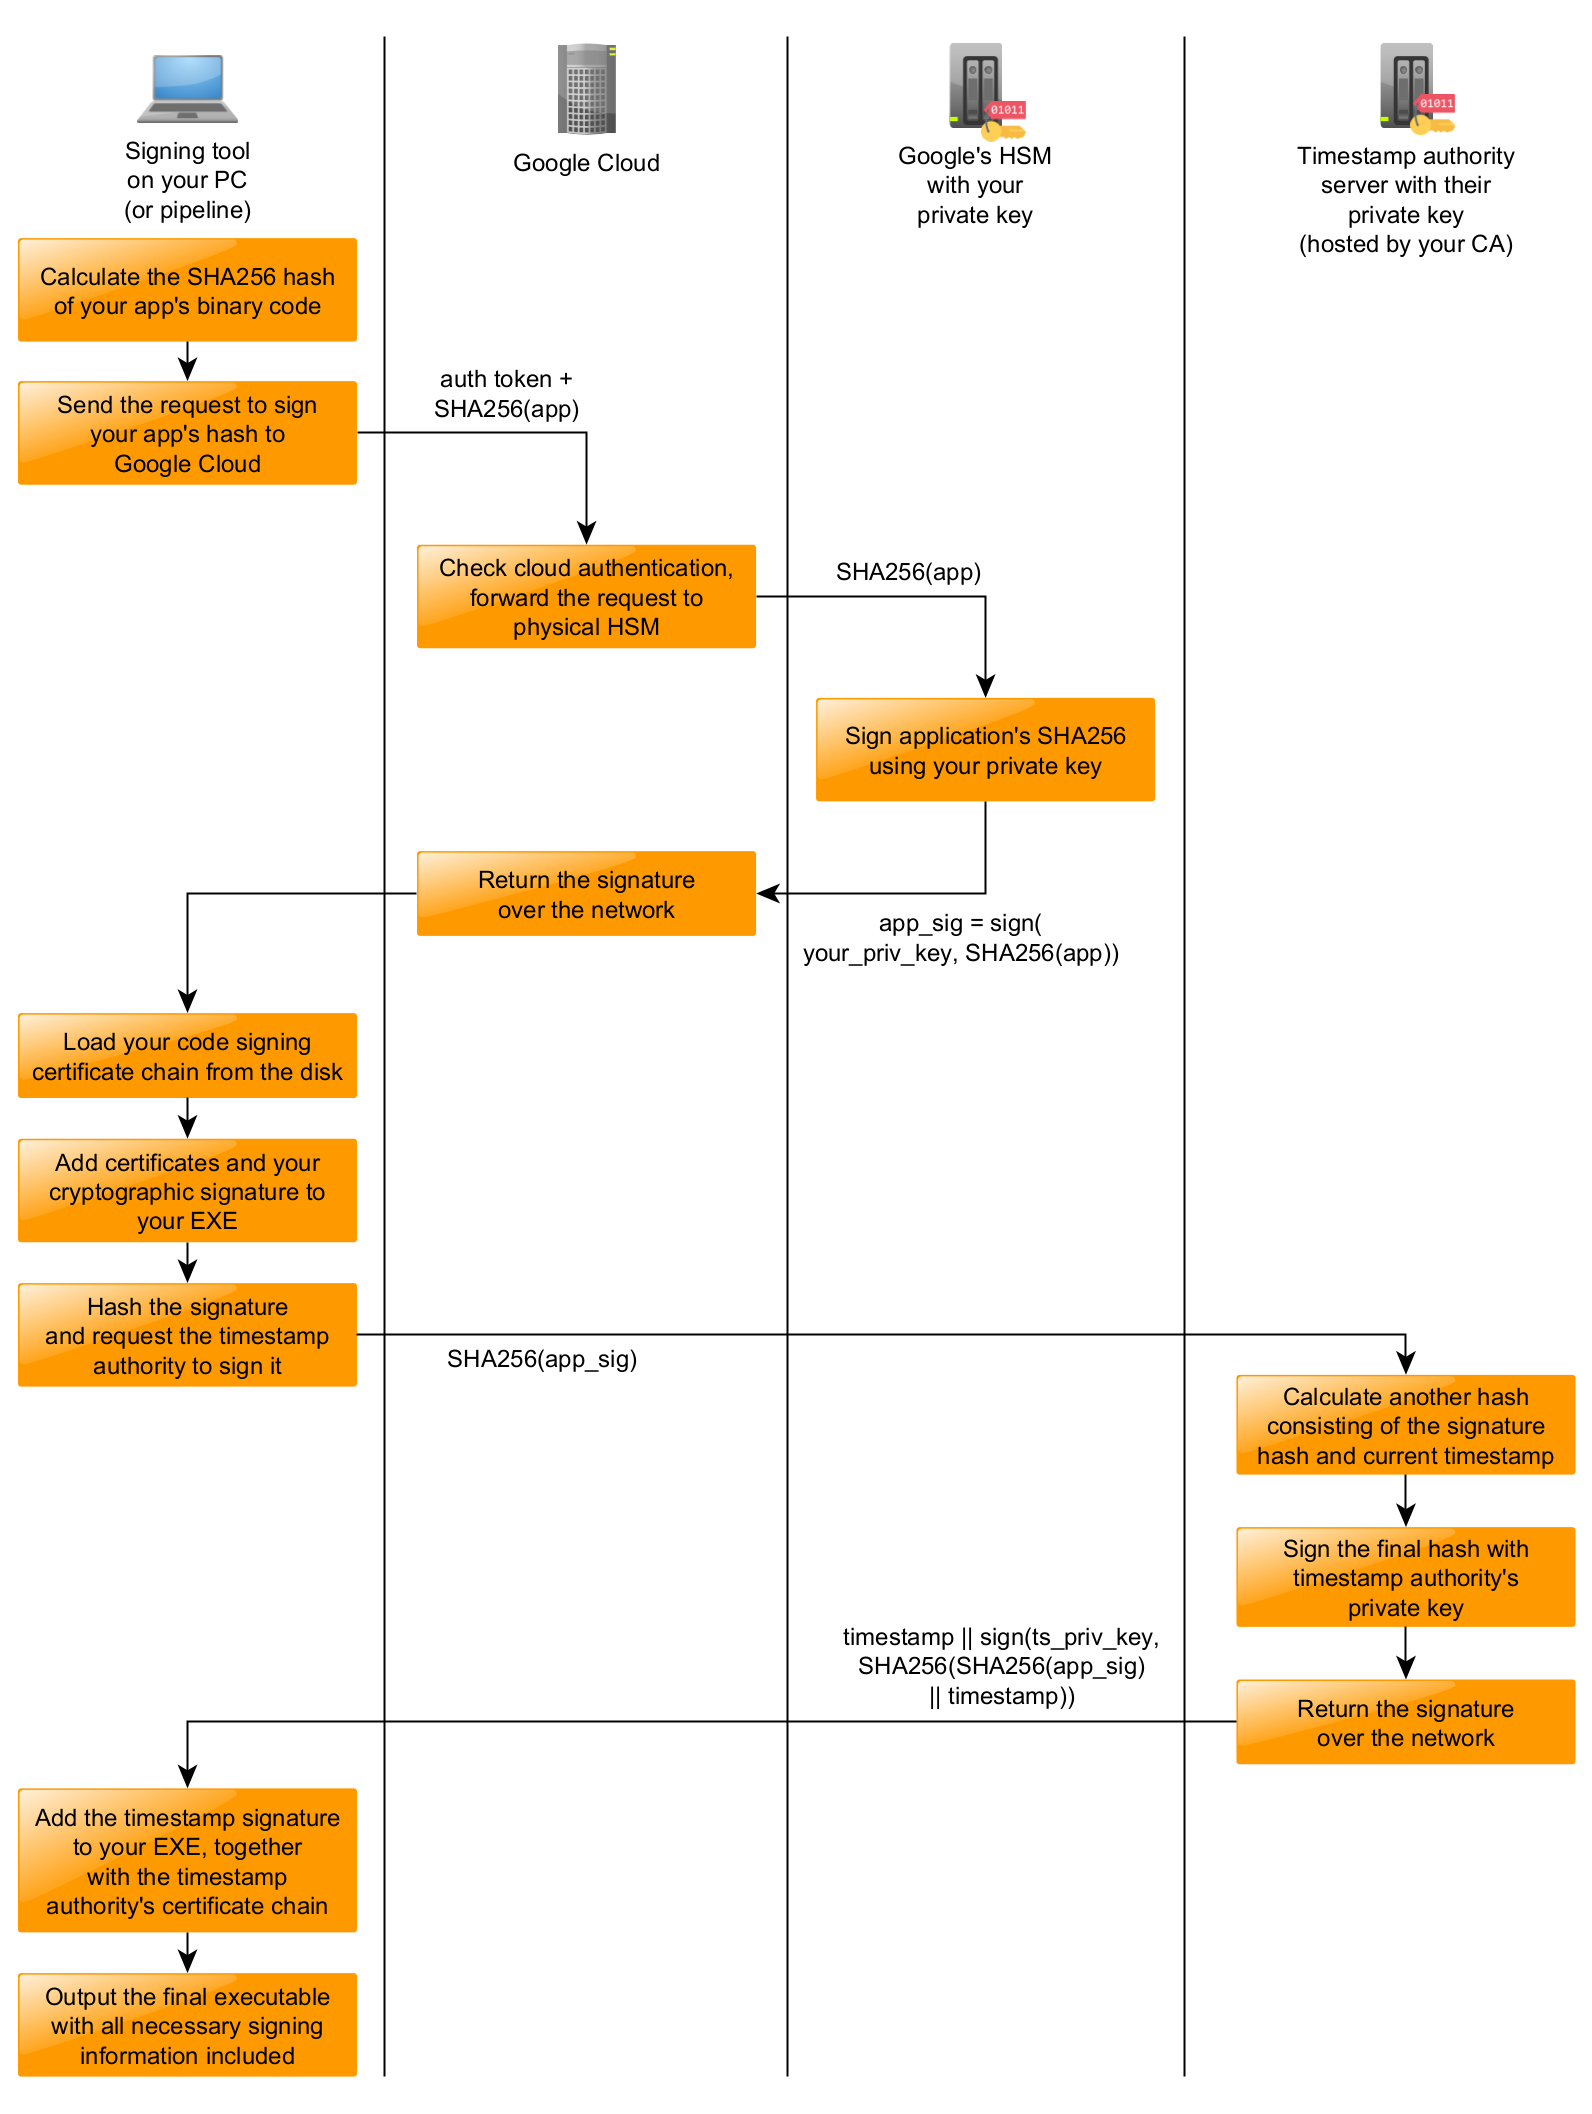 A simplified diagram of what happens when you sign the executable using the private key hosted in the cloud.
Disambiguations:
x || y- concatenation of two binary strings;sign(priv_key, data)- asymmetric signing using RSA or ECDSA;priv_key- your private key hosted in Google’s HSM;ts_priv_key- timestamp authority’s private key (hosted by your CA);SHA256(app)- cryptographic hash of the application’s binary, excluding certain sections which are not covered by the signature (so it’s not just a simple file hash);SHA256(app_sig)- cryptographic hash of your signature, used for applying the trusted timestamp;
Note: The above diagram might not accurately convey certain low-level technical details. It’s purpose is to show how the signing process works as a concept.
Optional: If you want to learn more about how application signatures are processed on Windows, I recommend reading “Authenticode (I): Understanding Windows Authenticode” article.
Q: Why I can’t just store my privatekey.pem on disk?
The most important fact about such design of the signing process is that the private key corresponding to your code signing certificate will be hosted on a certified HSM device owned by Google Cloud, without the possibility to just download the key from that device. It’s not longer allowed to just have the code signing private key straight on your hard disk, as the key might be stolen by malicious actors and this could lead to uncontrolled use of your code signing certificate.
Q: Does Google Cloud or my CA see the binaries that I’m signing?
With the diagram presented above, you should also note that even though the code signing process would involve contacting at least two remote servers (Google Cloud and Your CA’s timestamp server), none of them would be able to see the contents of your executable that you are about to sign. In both cases, only the cryptographic hashes (SHA-256 or similiar) will be transferred over the network. The cryptographic hash alone doesn’t usually constitute any meaningful information, so there is no risk that somebody will be able to see you binary until you really publish it.
Q: Why is the extra timestamping step necessary?
By default, it’s not possible to accurately figure out the exact time when you had signed your binary. Due to that fact, all your signatures will be considered invalid once your code signing certificate expires (namely after a year or two). This was implemented in order to prevent developers from backdating their signatures. Otherwise, it would be possible to just turn back your local computer’s clock and use the same (expired) code signing certificate endlessly.
When you apply a trusted timestamp to your signature, there will be a reliable information about the exact point of time when the signature was made. Due to that, your signature will be treated as valid even after your code signing certificate expires. Basically, it will be valid as long as the timestamp authority is trusted and the underlying hash function was not publicly announced as broken. Please also note that the expiration of timestamp authority’s certificate still would not affect the validity of your signature if the timestamp authority’s certificate was not revoked due to security issues.
Adding a timestamp to your signature doesn’t require the access to your private key and basically comes with just a minimal extra setup. We will show how to do it in the later sections of this article.
Optional: If you want to learn more about this topic, you can read “What is a timestamping authority?” article or jump straight to the RFC 3161 specification.
Cost estimation
Obtaining an EV Code Signing certificate and hosting it on Google’s HSM would come with some cost. These cost estimations are valid as of March 2023:
- USD $410 - for Code Signing EV certificate lasting 1 year (GlobalSign’s offer);
- USD $2.5/month (USD $30/year) - for hosting a single private key on a cloud HSM;
- USD $0.000015 - for every signing operation performed;
There are also a few organizational costs which depend on your hourly rate:
- Few hours of work time in order to gather necessary documents and complete the vetting process;
- Few hours of engineering time in order to setup the HSM key on Google Cloud, generate the CSR and manually test the signing process after the certificate is issued;
- Additional engineering time needed in order to create the Continous Integration pipeline for code signing;
Assuming that you just have a single certificate and you are signing 100 binaries per day: USD $410 for certificate issuance + USD $30 for hosting the key on Google Cloud KMS + USD $0.55 for the HSM usage = USD $440.55/year total + the cost of your engineering time.
The certificate issuance cost might differ depending on the CA company where you place the order.
Setting up Google Cloud Account
To begin the entire setup process, you need to register an account with Google Cloud Platform. After your account has been set up, please also create a new project and enable Billing, as you wouldn’t be able to continue any further without providing your payment details.
Accessing Key Management
After you are done with the basic configuration, please enter the Security -> Key Management section in Google Cloud Console.
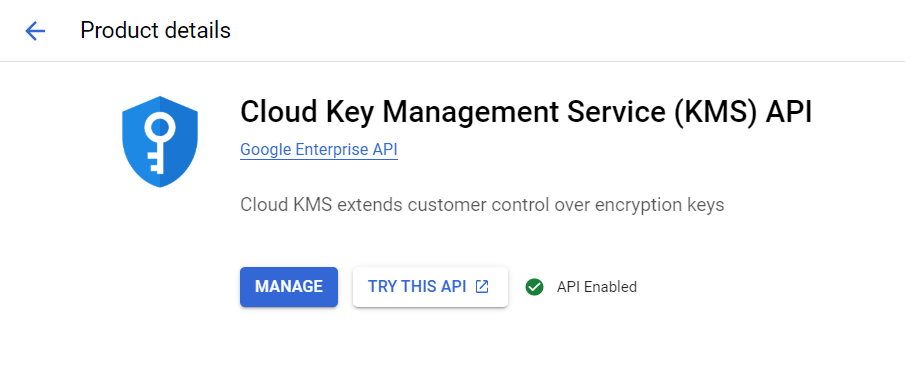
Important: You might get redirected to the Google Cloud Marketplace, where you will be asked to enable “Cloud Key Management Service (KMS) API”. Please enable it and try to navigate back into the “Security -> Key Management” section. You might get an error that billing is not enabled for your account (although it is), or it might again redirect you to the API marketplace page over and over.
It’s usually required to re-authenticate to the Google Cloud Account for the changes, such as enabling the KMS API, to become effective. There seems to be a bug with the Console that causes this unintuitive behavior.
 If you constantly get redirected to this page while trying to access “Security -> Key Management” please ensure that
you have Billing activated and that this API is activated too. Then, you will need to wait for a few minutes before
changes are effective.
If you constantly get redirected to this page while trying to access “Security -> Key Management” please ensure that
you have Billing activated and that this API is activated too. Then, you will need to wait for a few minutes before
changes are effective.
After the account is configured succesfully and all the changes become effective, you should see the following page when you click on “Security -> Key management”:

Creating a key ring and HSM key
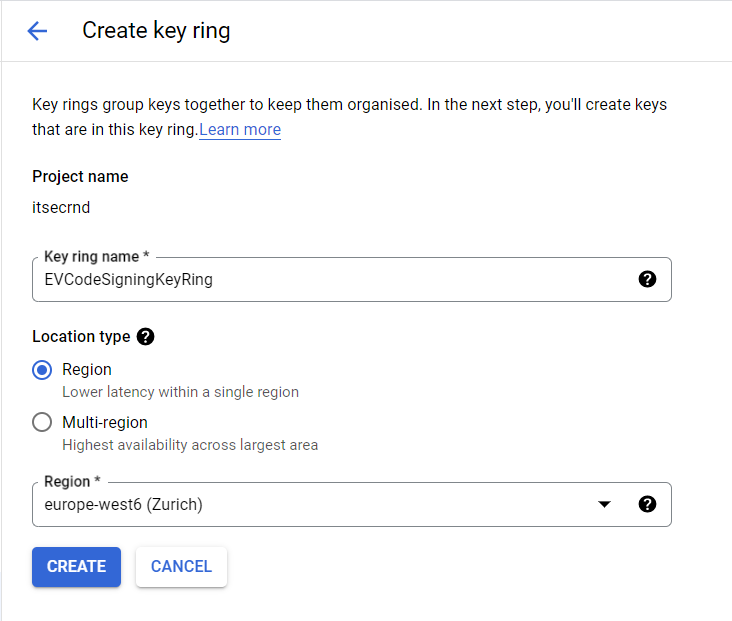
Click on + CREATE KEY RING and enter some name for your new key ring. Choose whatever region that suits you and has
the KMS service available.
Then, navigate inside the newly created key ring and click + CREATE KEY. Pick whatever name for the key and
obligatorily choose:
- Protection level: HSM;
- Key material: HSM-generated key;
- Key purpose: Asymmetric sign;
- Algorithm: 4096 bit RSA - PKCS#1 v1.5 padding - SHA256 Digest;
- Duration of ‘scheduled for destruction’ state: 60 days;
You can leave the remaining settings as defaults.
Note: With the suggested setting of “duration of ‘scheduled for destruction’ state” you will have to wait 60 days after initiating key deletion for the key to be actually deleted. In other words, this setting safeguards the key against accidental/malicious deletion. You can also choose to extend or shorten that time window according to your own security policy.

Obtaining attestation proof
Please navigate inside your newly generated key and choose the “Versions” tab. Then, please click on “Actions” (three dots) -> “Verify attestation” -> “Download attestation bundle”. You will receive a ZIP file containing the key attestation information.
Important: Please store the key attestation ZIP file somewhere. The Certificate Authority or your external auditors might ask you to present that file.
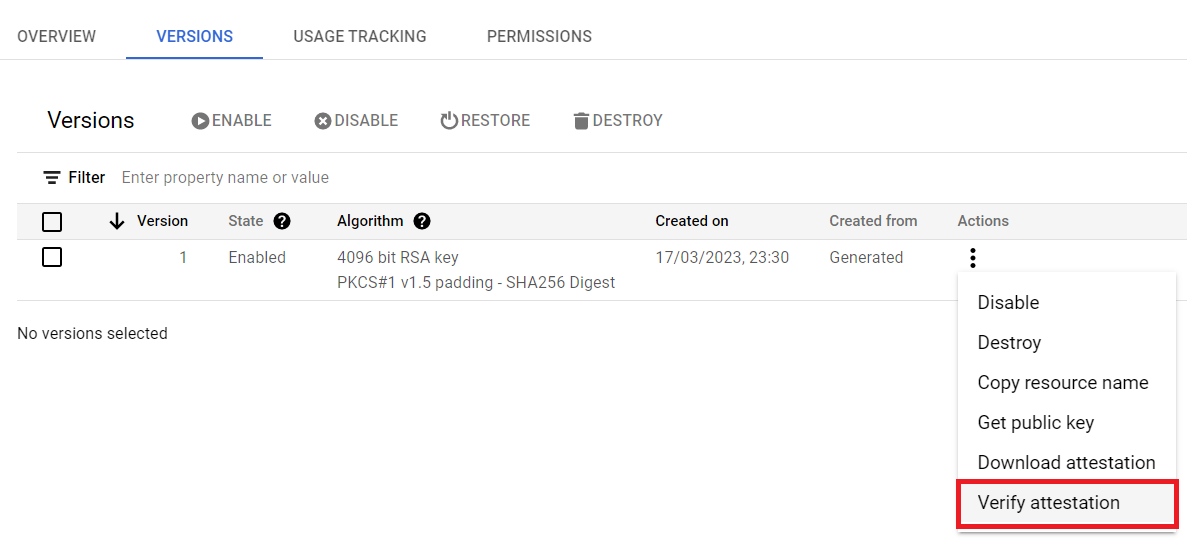
The key attestation contains basic information about your key: the matching public key, the information that the key was originally generated on the HSM and that the private key is marked as non-exportable, which means you can use it, but the HSM won’t let you just download the private key to your computer. The key attestation is signed by Google and HSM’s physical manufacturer.
Note: Keys hosted in Google Cloud’s KMS are even compliant with FIPS 140-2 Level 3, which exceeds the recent requirements for hosting code signing private keys.
Optional: If you want to learn more about how to parse the attestation file or verify it’s authenticity, check out the following sources:
Generating CSR
The CSR might be generated using standard “openssl” tools, although it needs to be signed with the corresponding private key as a proof that this private key really exists and you have access to it. This time we don’t have the private key just lying on the hard disk somewhere, as it’s hosted in the cloud. We need to tell “openssl” that it has to access the private key through Google’s API. This can be done by installing Google Cloud KMS PKCS#11 Library and doing certain preparations.
Optional: You can use my icedevml/pykmstool tool in order to quickly generate the CSR. If you would use that tool, you will be able to skip that section. If you don’t want to use external tools, please just continue reading further.
Prerequisites
First of all, please install the required apt package:
1
apt-get update && apt-get install -y libengine-pkcs11-openssl
Then, download libkmsp11.so from GoogleCloudPlatform/kms-integrations GitHub releases page.
Extract the downloaded archive and store libkmsp11.so in /usr/local/lib. Set the path to the library in the environment
variable:
1
export PKCS11_MODULE_PATH=/usr/local/lib/libkmsp11.so
Next, create the text file in /etc/pkcs11-kms.yml and store the following contents:
1
2
3
---
tokens:
  - key_ring: "projects/{projectId}/locations/{location}/keyRings/{keyRingName}"
Where {projectId} is your Google Cloud project ID (it’s a string, not a number), {location} should be the location where your
keyring is hosted (e.g. europe-west6) and {keyRingName} should be the name you’ve used when creating the key ring.
Such as string is called “resource name” and may be obtained through the Google Cloud Console. Simply, open your Key Ring in the Console, and then click on “Copy resource name”, which is under “Actions” menu for the specific KMS Key that you want to use.
Next, you need to store the location of your configuration file in the environment variable:
1
export KMS_PKCS11_CONFIG=/etc/pkcs11-kms.yml
Google Cloud authentication
Once you will be done with all of that, you need to authenticate with Google Cloud in order to be able to access your key:
1
gcloud auth application-default login
The actual CSR generation
Then you can generate the actual CSR:
1
2
openssl req -new -subj '/emailAddress={yourEmail}/CN={companyName}/O={companyName}/' \
    -sha256 -engine pkcs11 -keyform engine -key pkcs11:object={keyName}
Where {yourEmail} should be replaced with your official email and {companyName} should be replaced with your company’s registered name in both places. The {keyName} should match the name of the key that you’ve given when creating the key in Google Cloud Console. You might need to include additional parameters in the -subj (subject) if your CA would mandate it.
Done! The generated CSR should appear straight on your terminal. This CSR will be signed with the private key that is physically stored on your Google Cloud’s HSM.
Note: This section is based on the Google Cloud’s “Using a Cloud HSM key with OpenSSL” official article.
Optional: If you are worried whether the CSR was created using the correct key, you can use the icedevml/kms-attest-verifier tool in order to compare the public key in your CSR against the public key contained in the HSM attestation file (see: “Obtaining attestation proof” section). The tool would also verify whether the attestation file states that the key was securely generated on the HSM and is marked as non-exportable. This might be useful if you want to conduct an internal audit in order to check whether all tasks were performed correctly.
Placing an order at the Certificate Authority & going through the vetting process
Once you have all the initial setup done, it’s time to choose the type of certificate and the Certificate Authority company where you would place the order. It would be optimal to choose the CA which explicitly claims to support private keys hosted on the external HSMs. It’s very important that you figure that out before placing the order. An incorrect choice during the order process might cause your CA to send you the physical USB dongle with the private key installed on it, and you would not be able to migrate that key into the cloud!
Note: It’s usually not worth to order just the standard (OV) code signing certificate, as you would need to take similiar effort but that certificate would only remove Windows SmartScreen warnings once you have established some “reputation”. It’s not fully defined what that means. Most probably you will need certain amount of downloads that users don’t report as malicious until SmartScreen stops displaying the warning. So it’s usually better to go with the EV certificate straight away.
A list of CAs where the instructions listed in this article worked out, according to the community feedback:
Please note that this list is not exhaustive. If you succeed with a different provider, kindly please let me know over the e-mail, including whether it required any extra (unlisted) steps to do so.
The length of the vetting process and the exact list of actions that you will need to take may vary between different CA companies and regions. In my case, the vetting process at GlobalSign took just a few business days and the agent (EMEA region) was pretty responsive. Although, please take some time to review the offers of multiple CA companies and pick the most appropriate one on your own.
At a certain point of the process, you will be requested to provide CSR (Certificate Signing Request). You might also be required to provide the declaration about the manufacturer and the model of the HSM, and/or the respective attestation bundle from the Google Cloud Console. These requirements are not uniform across CA companies and are dependant on their specific policy.
Note: If your CA is asking you about the HSM manufacturer and model, right now (February 2026) Google KMS seems to be using Marvell LiquidSecurity devices (formerly Cavium LiquidSecurity). You can verify that by inspecting certificate chain returned from the attestation bundle (look at the certificate subjects). I usually report that information as follows: “Manufacturer: Marvell; Model: LiquidSecurity (via Google Cloud KMS)”
Note: It appears that GlobalSign’s offer is restricted to the registered businesses only. If you are a physical person and want to obtain an individual EV code signing certificate, you would either need to register a sole proprietorship or check other CA’s offers.
Note: For Sectigo EV Code Signing Certificate, please see icedevml/pykmstool issue #29 for further information if you are running into any problems regarding the CSR and Key Attestation submission process.
Signing the executable
First of all, you will need to download ebourg/jsign tool, which is capable of signing executables using an external PKCS#11 module.
1
curl -L -o jsign.jar https://github.com/ebourg/jsign/releases/download/4.2/jsign-4.2.jar
Optionally, you can verify the build’s checksum:
1
echo '290377fc4f593256200b3ea4061b7409e8276255f449d4c6de7833faf0850cc1  jsign.jar' | sha256sum -c
Ensure that you are authenticated with Google Cloud:
1
gcloud auth login
and finally, you can sign your executable:
1
2
3
4
5
6
7
8
9
java -jar jsign.jar \
    --storetype GOOGLECLOUD \
    --storepass "$(gcloud auth print-access-token)" \
    --keystore "projects/{projectId}/locations/{location}/keyRings/{keyRingName}" \
    --alias "{keyName}" \
    --certfile "codesign-chain.pem" \
    --tsmode RFC3161 \
    --tsaurl http://timestamp.globalsign.com/tsa/r6advanced1 \
    app.exe
In the command provided above, please substitute the following placeholders:
{projectId}- Google Cloud’s Project ID (string, not a number);{location}- region of your key ring (e.g.europe-west6);{keyRingName}- name of your key ring as created in the Google Cloud Console;{keyName}- name of your HSM key as created in the Google Cloud Console;
Note that --tsaurl <url> should be the URL of your CA’s timestamp server - this is usually indicated somewhere on their webpage or documentation. Usually it doesn’t require any additional configuration on your side except for entering the correct URL in the command above.
Moreover, the codesign-chain.pem file (in PEM format) should contain the concatenation of your code signing certificate and all the CA certificates (root and intermediate), so as to form the entire path between the root certificate down to your own certificate.
Note: Please do not use the certificates downloaded from the attestation bundle when calling
jsign.jar. The certificates from the attestation bundle are only useful for additionally proving that you retain your code signing keys correctly and can not be used for this command. Thecodesign-chain.pemfile provided tojsign.jarmust contain your code signing certificate (issued by your CA) and the concatenation of your CA’s root and intermediate certificates (check your CA documentation to find them out).
Recommendations for signing in the CI pipeline
Once you have figured out how to manually sign binaries with your new certificate, pretty much the same idea could be implemented in whatever Continous Integration pipeline you would have. Please consider the following, non-exhaustive list of remarks below.
Don’t use your personal account for authentication
Do not use your personal Google Cloud account (with thousands of permissions) for automated application signing within Continous Integration pipeline. A potential leak of your credentials might give somebody the ultimate access to your account and this could lead to a complete disaster, namely: somebody requesting deletion of your HSM keys, using them to sign malware or ordering Virtual Machines on your behalf.
Required Google Cloud permissions
The authentication token passed to the jsign tool will need to have the following Google Cloud permissions granted:
1
2
cloudkms.cryptoKeyVersions.list
cloudkms.cryptoKeyVersions.useToSign
So this would allow the jsign tool to just list the versions of your HSM key and to use that key for asymmetric signing, nothing else is required.
Please note that different signing tools might be implemented differently and thus require a different set of permissions to work correctly.
For Continous Integration operations, I would recommend to create a separate service account with a custom role, which only has the required permissions.
Google Cloud IAM Conditions
You can additionally tighten the access so that the service account will be able to use only the particular key in the Cloud KMS.
1
2
3
4
5
(
  resource.type == "cloudkms.googleapis.com/CryptoKey" &&
  resource.name == "projects/{projectName}/locations/{location}/keyRings/{keyRingName}/cryptoKeys/{keyName}") || (
  resource.type == "cloudkms.googleapis.com/CryptoKeyVersion" &&
  resource.name.startsWith("projects/{projectName}/locations/{location}/keyRings/{keyRingName}/cryptoKeys/{keyName}/cryptoKeyVersions/"))
Replace {...} placeholders with the correct information.
Such condition can be universally applied to both required permissions (cloudkms.cryptoKeyVersions.list and cloudkms.cryptoKeyVersions.useToSign).
Don’t grant unnecessary iam.* related permissions
When assigning service account permissions, please make sure not to grant the iam.serviceAccountUser or iam.serviceAccountTokenCreator roles. These roles would grant pretty powerful access, which is not necessary here and could impose a security risk.
Service account authentication methods
There are two basic methods to authenticate with Google Cloud as a service account.
Using key file: The pipeline could authenticate using the “gcloud auth activate-service-account” command by providing the JSON key file.
Using OIDC: Alternatively, you could use OpenID Connect (OIDC) to authenticate your pipeline runners with Google Cloud without needing to store secret files in the pipeline. If you are using GitHub Actions, you can follow the dedicated guide for setting up OpenID Connect.
In either case, please ensure that your service account has absolutely minimal permissions and that any access credentials are safely protected and used within the pipeline. If somebody would be able to steal your credentials, he will effectively have the access to your code signing private key. This is a very undesired situation, as somebody might sign some unrelated executables (malware) with your certificate. This might lead to your certificate being reported to the CA and getting revoked.
Limit access to your signing pipeline
If your pipeline supports “workflow approvals” or certain similiar restrictions, it’s worth to enable them for the Continous Integration jobs that are involved in the binary signing process. If the project is public, or accessed by multiple developers, please also make sure you don’t generate the signed binaries for Pull Requests/Merge Requests.
It’s very important to understand how your Continous Integration system works and to ensure that only the trusted project maintainers would be able to generate the signed binaries.
Authenticate externally downloaded binaries
If you are downloading external binaries (like jsign.jar tool) within your signing pipeline, please make sure to authenticate them via file hash
or using any other reliable method. The externally hosted binaries might someday get replaced by malicious actors, so it’s better to make sure
that you are always running the expected version of the software.
(GitHub Actions) Pin your external actions to the exact commit hash
When you are using GitHub Actions pipelines, please also make sure to pin your external actions to the exact commit hash. Why is is to important?
If you use the external GitHub Marketplace actions pinned to certain tag:
1
uses: example/foo@v1
… it’s never guaranted what the @v1 exactly is. It’s technically possible to rewrite the same tag to make it point on a different commit. That would mean, somebody could replace the code running in your signing pipeline without notifying you or requesting your approval. The main risk is that the action’s maintainer might get hacked and that malicious actors could replace the action’s code seamlessly.
The more secure way is to pin all external actions to the exact commit hash (basically the commit hash behind the tag you want to use), just like that:
1
uses: example/foo@9a77932de62ee4199961f1381b64d7d282daa3b7
It’s also worth to audit the entire code contained inside the action, just to check if it’s really self-contained and doesn’t depend on any scripts/code/binaries that are dynamically downloaded from the unknown sources.
Security in general
Please review any guides and tutorials about Google Cloud account security and hardening in order to make sure that you are following the best practices.
Special thanks
Special thanks to Sudara who wrote the blog post about EV code signing with Azure HSM and GitHub Actions. This was one of my initial sources of knowledge and an inspiration to write the article about using Cloud KMS.
Summary
In this article, we had shown how to get through the entire process of generating the HSM-secured key on Google KMS, generating the Certificate Signing Request, obtaining the Code Signing certificate and using it to securely sign your application’s binary. The presented way of HSM key generation is compliant with the recent requirements.
I can also provide you with certain consultation services if you are feeling lost anywhere in this process. In both cases, please drop me an email at ml@icedev.pl.